Blackberry cardamom clafoutis

cardamom berry clafoutis

Hello all! It’s been awhile. I got caught up with work, a bad case of strep throat and graduating from IU. Yes, that’s right. I am now an alumna of Indiana University. That’s kind of hard to believe.

However to celebrate my graduation, I thought I would return to one of my favorite desserts. This was a post I created at around the same time I featured a shake and bake blackberry clafoutis recipe at the Indiana Daily Student. It was one of my favorite videos and I loved the concept of having an easy clean up recipe.

This recipe adds a hint of cardamom that compliments that tart sweetness of blackberries. You can of course, not make this recipe in a jar. In fact, I have a traditional recipe that you can take the preparation steps from here. However if you want something that is fast and involves a quick clean up, give this recipe a shot.

Ingredients

  • 1 1/4 cup milk
  • 1/3 cup sugar
  • 3 eggs
  • 1 tablespoon vanilla extract
  • 1/8 teaspoon salt
  • 1/2 cup flour
  • 1 pinch ground cardamom
  • 1 cup fresh blackberries

Step 1: At the bottom of a greased baking dish, arrange the berries in an even, flat layer. Set aside.

Step 2: In a large jar, mix the dry ingredients. Add the eggs, stir well with a chopstick or long spoon until you have a thick paste. Then add the vanilla.

Step 3: Slowly add the milk into the jar while stirring. Twist the lid onto the jar and then give the mix a good shake for a few minutes until well combined.

Step 4: Pour the batter over the fruit into the baking dish. You can pour the mix over a strainer if there are remaining lumps. Place the baking dish in a 350 degree preheated oven and bake 20-30 minutes for a small dish like the one I used. 30-40 minutes for a larger dish.

cardamom berry clafoutis

Steamed mango pudding

final-5-crop

I thought of this recipe after making my udon egg custard recipe post. I loved how you could take only two ingredients and create a custard. Though I filled that dish with udon noodles and salmon, I wondered about how I could use that technique for a dessert.

Thinking of the instant mango puddings I often got at dim sum as a child, I thought to make a healthier alternative. This recipe can easily be made without any sugar if the mango is ripe enough (or if your pre-made mango juice is sweet enough).

The key to this recipe comes in two steps. First, you must run the un-cooked custard through a strainer to remove random egg bits and mango fibers. Second, this recipe does not taste good when warm. This has to be fully cold to be ready to serve.

Ingredients

  • 1 cup mango juice. You can either grind your own or use pre-processed juice, but try to avoid bottled juice with too much added sugar
  • 1 egg
  • Drizzle of honey
  • Optional: cream or coconut cream for topping

Step 1: Put a cloth towel on the bottom of a deep-depth frying pan. In a separate saucepan, boil enough water to fill the frying pan half-way.

Step 2: Crack the egg into a large mixing bowl. Run a fork through the egg whites to break them up. Then break the egg yolk and mix well.

Step 3: Add the mango juice and honey. Whisk well, then run the liquid through a fine-mesh strainer. Pour the remaining liquid into individual serving cups and then cover the filled cups securely with plastic wrap. Place the cups into the cloth-lined frying pan.

Step 4: Pour the boiling water into the frying pan – there should be enough water to cover the bottom 1/2 to 1/3 of the cups. Cover the pan with a lid and bring the pan to a rolling boil. When the water is fully boiling, reduce the heat to medium and cook another 10-15 minutes. The pudding is done when the top of the custard is opaque and you can push a skewer into the custard and it is solid.

Step 5: Pull the custard cups out of the water and have them come to room temperature. Then when they are cool, but them in the fridge for a couple hours to become fully cold. Serve with a drizzle of cream and sesame seeds.

final-2-crop

mango pudding


Check out my other work page for more recipes

final-option-2-edit-crop

So in the last couple weeks I have spent quite a bit of time expanding my work for the other websites I work for. This would explain my lack of posting so far this month on The Glutton Diaries, sorry for the delay! I have some recipes in the works to release in the next week or so, as well as the recipe updates that are listed as “coming soon” on my recipes page.

However for this post, I thought I would give you guys a subtle push to look at my  “other work” page. I have been working on a lot of projects lately and that page is heavily updated with fresh work. Below are some teasers of a few projects that I have worked on lately.

Click the images to get to the main page that contains the recipe. (The same can be said for the oatmeal photo above.)

amaretto mixed drinks

Amaretto 2 Ways:

For this post on the Lala, an online magazine, I focused on Amaretto, an almond flavored liqueur. While I only feature the one image above, in the post I give two options, one for summer and another for winter.

mac and cheese

Garlic Mac and Cheese

The Lala is an online magazine that caters to college-aged readers. With that being said, I wanted to focus my work on simplifying comfort foods. I also recognize that mac and cheese is a common thing to reach for in terms of instant foods, right after ramen. I wanted this to show that instant foods are not always the best option.

blender pudding

Blender Pudding

Another anti-instant food recipe, however this was for the Indiana Daily Student. I do weekly recipe videos for them and I released this for them a couple weeks back. This is a pudding recipe that only requires one step, which is to blend everything together, and is made from scratch.

cilantro pesto salmon

Cheap Gourmet – Using herbs to make cheap food fancy

The photos above and below were from an herb post I did last week. I wanted to create a series of recipes that showed beginner cooks that inexpensive food can be turned gourmet with the addition of cheap herbs. Above is a cilantro pesto, this recipe also has a video that goes alongside it. Below is a mint lentil soup recipe.

red lentil soup

Salted Chocolate Dipped Strawberries With Lemon

chocolate covered strawberries w/ lemon salt

I didn’t really see the point of doing a full recipe post on this since all you have to do is dip and sprinkle. However I have to admit that I never thought adding salt to a chocolate dipped strawberry would be so good.

I first thought of this after remembering a piece of advice my grandpa would tell me when I was growing up – that is to put salt on slices of sour pineapple. It would make it sweeter, he said.

At the time, I had been too little to realize that a teaspoon of salt on a cup of pineapple would be disgusting, however after trial and error I did figure out his secret. Additionally, salt brings out great flavor in chocolate, so this is a win-win situation.

Only I have brought the chocolate covered strawberry to a new level. This summer, I had an obsession with lemon. I put it on everything. I also loved lemon with strawberry – which you can also see in my roasted strawberry ice cream sandwich post. The lemon zest makes everything taste fresher. Paired with a pinch of black salt and a heaping of dark chocolate, I could make no wrongs.

So I tried the pairing out, took a photo of it, then proceeded to eat everything. I urge you guys to do the same.

Moroccan influenced quinoa cakes

final

Based on a request from one of my vegetarian friends, I wanted to try making something fun she could eat. Her one request was that it involved quinoa as it “is one of the only non-animal sources of B12 for a vegetarian.”

Since quinoa rotates through her meals at least once a week, I was determined to think of something cool for it. I’ve also found that most quinoa recipes come in the form of salads, or simply warm but loose as a grain, so I played with what shape it could make.

My thought on vegetarian food is that if there isn’t meat to give that savory sense of taste, I’d use every flavor and texture combination possible for this dish. I wanted something satisfying. What’s my definition of satisfying?

It’s something that touches all of the bases. Is it salty? Sweet? What about crunchy?

I gave myself requirements.

There had to be a variety of textures. I wanted there to be a substantial chew, something hearty. There had to be crispiness and creaminess. There had to be a punch of flavor- which is why I went the Moroccan route. It’s spicy and sweet. There was that umami element there that would replace the savory aspect of meat.

So Julia, this is for you girl!


Ingredients:

Cakes

  • 1 ½ c. quinoa, cooked
  • 1 egg
  • 3 tbs. flour
  • 2 tbs. raisins
  • 1 tbs chopped mint
  • ¾ tsp. cumin
  • ½ tsp. cinnamon
  • Pinch allspice
  • Pinch nutmeg
  • Pinch cloves
  • Pinch ginger
  • Salt and pepper to taste

Kale

  • 2 cups kale, stalks removed
  • 2 cloves garlic, chopped
  • Salt and pepper to taste

Egg topping

  • Enough water to generously fill pan
  • 1 tbs. white vinegar
  • However many eggs you want
  • Dollop of sour cream optional for topping.

*Spices are relatively optional based on availability- however cumin and cinnamon MUST be included.


mix

Mix all the ingredients.


mold

Form palm sized disks, about three tablespoons a handful. Make solid pressing movements, the binding can be a bit loose. Worst case, press back together when cooking.


fry

Pour a generous amount of oil in pan, enough to coat the bottom. Drop cakes in pan, press slightly with spatula to create solid flat bottom. Cook till golden on both sides. Remove to paper towel lined plate. Set aside.


kale

Drop kale and garlic in remaining oil. Cook till tender, but not soggy. Season to taste.


egg

Pour water and vinegar in saucepan. Make sure there is enough water that the egg when dropped does not come close to the bottom. Gently drop egg in water, and with a big spoon, nudge and hold the egg in the water to prevent it from touching the bottom of the pan. Cook two minutes. Remove with slotted spoon.


plate

I decided to go artsy with my plating. You do not have to use a cookie cutter to mold the kale- go ahead and just spoon in on the plate. But if you want to be like me: place a 3 inch cookie cutter in the center of the plate. Press the kale into the mold, pushing to make sure the shape stays. When full, use a spoon to push the edges of the kale down while you remove the cookie cutter from the plate. This prevents the greens from moving too much.


stack

Start stacking. Place the quinoa cake on top of the kale. Then lay the egg on top. I wanted more creaminess, so I put a dollop of sour cream on after. Then top with whatever garnish you like and slit the egg’s side to release the creamy yolk. Or just dig in!

Fun note, if there is anyone that cannot eat eggs, you can omit the poached egg, and replace the egg in the cake with three tablespoons ground flax seed with a little water.

Let me know how yours turns out!

Sesame crusted salmon with chive wontons

final

Since I’ve started interning at the American Heart Association, health has become a forefront in my cooking. I realize that this may sound a bit ironic coming from a girl whose blog revolves around her eating and cooking. However when I read on a daily basis about the things that are making us unhealthy, I just can’t ignore them.

With that being said, I looked for something that would emulate the texture of something deep fried. I wanted something with a  serious crunch to prove that something that feels unhealthy doesn’t have to be. Then I remembered a tip I learned last semester when I interned at a culinary school. I was taste testing one of the student’s meals, an exploration of how many ways someone can cook salmon. Off to the side was sesame crusted salmon. This nutty exterior lends the tender fish just the right amount of crunch. Only without using too many carbohydrates, which was exactly what I wanted. This crust also doesn’t require a lot of oil to pan fry the exterior. The seeds actually crisp up on their own, we just help them out a bit with a little oil.

I also had some wonton skins leftover from when I made basil cilantro dumplings. So this is where this recipe came from. A combination of east meets west, in a way.

*Just a note, this is not an AHA recipe. I am also not a nutritionist. However this recipe was made with the intention of being on the healthier side. I, however, did not want to sacrifice the flavors of certain ingredients. So you will see some things that may not seem healthy- like the knob of butter used to sauté the chives. Feel free to sub any of these ingredients for a version that suits your diet if need be.

Ingredients

  • 1 cup finely chopped chives
  • 1/2 cup finely chopped greens, you can go with anything save for lettuce, I recommend kale or spinach.
  • 1/2 teaspoon lemon zest
  • salt and pepper to taste
  • 1 tablespoon butter
  • A package of wonton skins, this recipe will yield about 20 dumplings. Any leftovers should be kept in an airtight container.
  • 1 small filet of salmon, cut into 1 inch cubes
  • 3 tablespoons whole toasted sesame seeds
  • 3 tablespoons flour seasoned to taste with salt and pepper
  • 1 egg beaten
  • 2 cups low sodium chicken broth
  • Fresh vegetables to garnish, I went with cabbage and tomatoes.


sauté

Sauté the chives and greens in the knob of butter until soft. Season with salt and pepper. Add the lemon zest.

fill

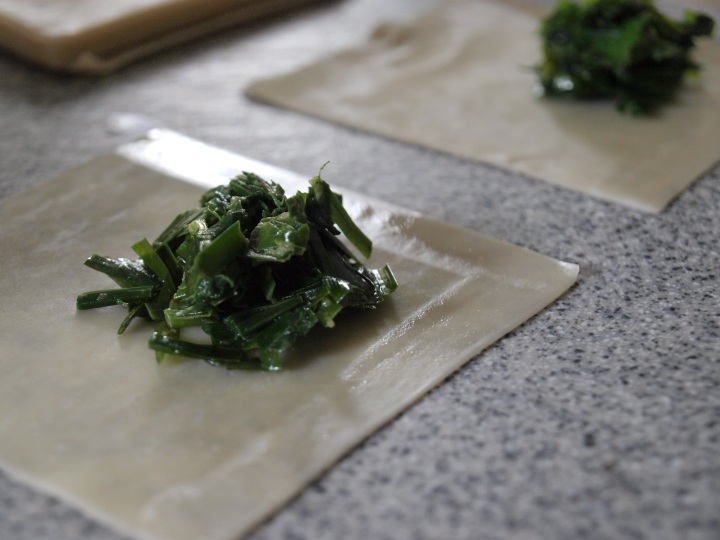
Take a wonton wrapper and with your finger, moisten two sides of the dough with a drop or two of water. Drop a tablespoon of the chive mixture.

seal

Fold one corner over the other to create a triangle. Slowly seal the edges, all while pushing out as much air as you can. Any air left in the wonton will make it puff when cooking, making it hard to tell if it is fully cooked. You want these to be as flat as possible.

prep

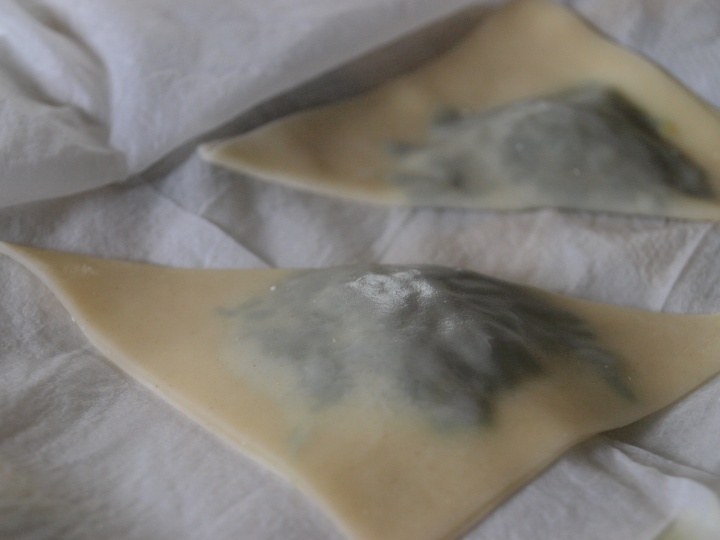
Lay them in a single layer on a plate. This is a relatively large batch, and you can organize the dumplings by keeping a damp paper towel between the layers to keep them separated. When you are finished you must cover them with a damp paper towel or the wontons will dry out.

boil

Bring a pot of water to a boil. Drop the dumplings in groups of about 5 or 6 into the water, making sure to give a strong initial stir to keep them from sticking to the bottom. When they float up, and the wontons are translucent, scoop them into an oiled plate. Swirl the wontons in the oil to keep them from sticking together. Continue doing this until all the wontons are cooked.

salmon

Take the cubed salmon and pat them down with a paper towel. You want them to be as dry as possible.

bread

Now measure out your breading ingredients. The flour will create a dry surface on the salmon, which will enable the egg wash to stick, and the sesame will form your crust.

bread 2

Take your salmon and pat two opposite sides in the flour. Then repeat the process in the egg. Finally, drop the salmon into the sesame seeds. Repeat the process for all of the salmon. Of course, I did the small pieces for the pretty visual effect. If you are in a rush, you can do the entire filet in one step. Doing this will only increase your cooking time by a couple minutes on each side.

cook

Now lightly oil your frying pan and heat it to medium. Place one side of the salmon down and cover with a lid. Let it cook slowly, allowing the fish to cook while preventing the crust from burning. After cooking about three minutes, flip the fish over and cover again, cooking for three minutes. Repeat this step for all of the fish. If your crust risks overcooking before the fish is ready, pull it from the stove and place it on a baking rack. Continue to cook it in the oven at 350 °F. The fish is done when it no longer looks translucent. No matter which way you finish cooking, let your salmon cool on the baking rack – this prevents steam from making the surface soggy.

final 2

Finally heat your chicken broth. I added a couple leaves of fresh basil to scent my soup. Add in your wontons to reheat them. Prepare your vegetable garnishes.

To serve, scoop some dumplings with broth into a bowl. Add your veggies and top with salmon.

Cherry clafoutis

final

The first time I ate clafoutis was at a birthday party my host family held. As you guys may have read in my About page, I lived in Paris with a  Franco-Italian host family this last Spring semester of college. As awkward as it was with the language barrier, the family always invited me to their family gatherings.

My host aunt brought over two desserts, an apple and prune clafoutis. Both of which were shoveled onto my plate at dessert with a stern look from my host uncle. He said, “You must try both of them, my wife made them and they are delicious.” I, with a completely full stomach, accepted with a hesitant smile. He then made an “I’m watching you,” gesture with two of his fingers and then gestured to the two plates of cake. I all but licked my plate clean under his watchful eye and received an “I told you so.”

Regardless of how full I was, I loved those desserts. Mostly because of how simple they were. My host aunt explained the steps to me, it was pretty easy. A clafoutis is basically a custard poured over fruit, then baked. In the oven it will rise, looking almost like a cloud. Once cooled it sinks back down to create a dense cake. Cherries in this case make the dessert pretty striking and the acidity helps cut through the sweetness of this dessert.

*Fun fact for the day, the clafoutis cake (pronounced like clah-foo-tee) originates from the Limousin region of France. Looking back on my time there, I knew my host mother’s family originated from a southwestern area close to that region. Though I never found out what actual city where she was from, I wonder if she came from the region of the clafoutis.

Ingredients

  • 1 1/4 cup milk
  • 1/3 cup sugar plus 2 tablespoons for sprinkling
  • 3 eggs
  • 1 tablespoon almond extract
  • 1/8 teaspoon salt
  • 1/2 cup flour
  • Zest of one orange
  • 1 cup pitted, halved cherries


sugar

In a large bowl, stir together the sugar, flour, salt and zest.


eggs

Add the eggs. Stir.


milk

Then add in the milk and extract.


fill 1/3

Pour enough mixture to fill a greased dish 1/3 of the way. Bake at 350 °F just long enough to create a skin at the surface stable enough to support the cherries. This can take about 5 minutes depending on your baking dish.


cherries

Pull out the dish and add the cherries. Sprinkle with a little additional sugar. For those watching their sugar, you can either adjust or omit this step.


fill

Pour the remaining batter on top and return to the oven for another 40 minutes. The clafoutis is done when it is puffed, like a cloud, and golden brown. A toothpick when inserted should come out clean.


final 2

Let cool just enough for the cake to sink back down. While this dish is good cold, it is best warm with a bit of ice cream like shown above in my mini version made with leftover ingredients.


Almond fig galettes

final

I recently got my hands on a giant box of fresh figs. I have never cooked with them before, I really have only seen them in jams and cookies, however I always loved their subtle sweetness. I am also smitten with how pretty these fruits are. Green skin with slight splashes of pink hide a rose interior. I’ve never worked with these fruits fresh, and to be honest, they are pretty boring looking once dried or cooked. These turned brown when baked, which lost all the pretty coloration. However they did become chewy, which gives a good texture to this dessert.

Since I didn’t have much experience with figs, I went to Pinterest to try to get an idea on what I could do and I found that tarts and galettes were the most popular choice. I have also never made a galette before, so I thought, well here’s a way to knock out two culinary experiences with one stone. The crust comes from the Smitten Kitchen, and I added an almond filling to make the galette a bit more substantial than just a fruit filling.

Ingredients

The crust

  • 1 1/4 cups all purpose flour
  • 1/2 tablespoon sugar
  • 1/2 teaspoon salt
  • A stick butter, cut into centimeter sized cubes
  • 1 cup ice cold water, only 1/4 cup will actually be used

The filling

  • 1 tablespoon melted butter
  • 3/4 cup ground almonds
  • 1/4 cup brown sugar
  • 1 egg
  • 1/2 teaspoon almond extract
  • 1/2 teaspoon vanilla extract (optional)
  • 1 tablespoon dark rum
  • 1/8 teaspoon salt
  • 1/2 teaspoon fresh lemon zest
  • 4-5 fresh figs, sliced


flour

First, drop a couple ice cubes into the water. Set aside. Then in a large bowl, mix together the flour, sugar and salt.


butter

Drop in the butter. Using a fork, start pressing the butter into the flour. Make quick, pushing movements. The goal here is to not make a dough by stirring, you are in a way, massaging the butter into the flour to make a sandy mixture. Move as quick as you can to ensure the butter doesn’t have a chance to warm and soften. Stop when you see pea sized bits of butter left, like in the picture. It doesn’t have to be even. In fact, you want it to be lumpy- those lumps of butter will create the flakey layers in your crust.


water

At this point, measure out 1/4 cup of the ice water and start mixing it into the mixture. Make sure any ice cube pieces are not included when you pour. Again, this will not be a stirring motion. You want to try to press the flour clumps into the water. Keep pressing until you get a uniform dough.


ball

When the dough starts to pull together, use your hands to knead the ball a couple times to ensure it is fully combined. Then wrap in plastic wrap and refrigerate for an hour.


filling

Mix together all the ingredients for the filling, except the figs, until combined. Set aside.


roll

Once the dough is fully cooled, cut it into four pieces. Leave three of these pieces wrapped in the plastic, and return them to the fridge. You want to make the galettes one at a time, and having the coldest dough possible will make your life easier. I promise you. Take the quarter of the dough and push its corners with your hands until you attain a make-shift circular shape. Flour your work surface and your rolling pin, then start rolling the dough until it is about 1/4 an inch thick.


fill

Take your almond filling and spread it in the center. Then spread your figs. You can move the figs in any shape you want, you can spiral them in a circle for example. However I wanted the almond filling to show, so I went in a line.


fold

Fold and pleat the sides together and transfer the galette to a baking sheet lined with foil. Repeat the process for the last three pieces of crust dough.


final 2

Bake at 375 °F for 50 minutes to an hour until the crust is golden brown. The goal is for the bottom of the galettes to be opaque and cooked through. If the almond mixture browns too fast, cover the baking sheet with foil.

The smell of these baking in my kitchen was unimaginable. Something about a simple butter crust turns unbelievably nutty in the oven. These could be made the more traditional route with sliced pear, the pear almond tart is one of the most common French pastries I’ve ever seen. However, there’s nothing funner than cooking with a new ingredient. I embrace the fact that I am a baking nerd. Let me know what you guys try out with this recipe!


Brussels sprout mac and cheese

final

Alright, it is time for the last of the childhood favorites series. I’ve had fun with it and might revisit it in the future.

Here I took everyone’s favorite: macaroni and cheese. Only I took out the macaroni and topped it with, hilariously enough, most kids’ least favorite vegetable, the brussels sprout.

I’ve always liked them, I think that as a child I was determined to be the one kid who liked the detested vegetable. I mean, they make some adults still cringe.  Yet, I am determined to shed its infamous reputation.

If you take brussels and fry them in bacon fat, they can do no wrongs. Granted, my rule is that anything fried in bacon fat must be delicious. However the bitterness that most people associate with this cruciferous vegetable is paired nicely with a crispy texture and a good dose of fatty, umami flavor.

Ingredients:

2 strips bacon
1/4 cup minced carrot
1/2 cup chopped onion, red onion preferred
1 clove garlic
4 cups brussels sprouts, halved
2 cups dry pasta of your choice
4 cups water
2 tablespoons butter
2 tablespoons flour
2 cups grated white cheddar
Hot sauce optional
Eggs optional

Season to taste

bacon

Cut the strips of bacon into chunks, fry. When cooked, pull them from the pan, leaving the fat behind.


veg

Cook the carrots and onions in the bacon fat on high for 4 minutes, stirring constantly. These are here mostly to season the sprouts so they have to be nearly fried and carmelized by the time you reach the next step.


brussel

Blister the brussels sprouts on high heat for  5-7 minutes, stirring constantly. At this stage the carrots and onions will be easy to burn otherwise. Cover, then continue cooking on medium low for another 5 minutes. They are done when harder core is firm, but not hard and the leaves are tender.


boil

Boil the pasta, al dente.


butter flour

Start making your roux, this will thicken the sauce. Melt the butter and add the flour. Cook while stirring for a minute  or two until the paste is lightly golden.


milk

Add the milk slowly. The first few tablespoons will make the roux recede into it’s self. This is ok. Continue adding the milk while breaking up the thickened paste. Eventually it will thin out until it reaches the proper consistency. It should coat the back of your spoon.


cheese

Add the cheese and in my case, the hot sauce. Season to taste with salt and pepper.


Pasta

Stir in the pasta.


mix

Pour the mix into a greased casserole pan. Top with the brussels sprouts and reserved bacon. Bake at 350 ˚F for 15 to 20 minutes. It’s finished when the top is golden brown and crispy.


egg

I happen to love eggs, and more specifically, warmed egg yolks. If you want you can separate some of the brussel mac like I did into smaller serving dishes and crack an egg on top before baking, I recommend it. You can also crack them directly over the casserole if you wish. The extra level of creaminess really does the trick.


Peanut butter and jelly French toast

final

My last post introduced this week’s theme: reinventing childhood favorites. This post is going to play with the idea of a peanut butter and jelly sandwich.

In my opinion everyone has a childhood memory of this sweet and salty concoction. Whether they liked it or not, they will always remember it from their school days. I for example, cannot forget the memory of my mom surprising me with horrendous Cheese puff PB and J’s every Halloween with a note written in the wrapper making a cheesy pun on the “scary” flavor combination.

A girl just can’t shake the memory of her elementary-age self biting into a sandwich to find a soggy jelly covered cheese puff hanging out of her mouth.

Yet, here is my version on the peanut butter and jelly sandwich. I promise it is not going to include any cheesy junk food of any form. In fact, it isn’t even a sandwich anymore.

I decided to play with the idea of a peanut infused French toast with jelly syrup. Because if anything, I love taking the traditional idea of a food and completely messing it up. So here it is- my deconstructed PB and J sandwich.

Ingredients:
2 tablespoons peanut butter, melted
1/4 cup milk or half and half
2 tablespoons brown sugar
1-2 tablespoons roasted sesame seeds (I like how they add another nutty element)
1 teaspoon vanilla extract
Dash cinnamon
2 eggs
about 6 slices of bread, stale (Soaking time varies based on how many slices of bread can be used, adjust soak time based on your preferences)
Jelly, whichever you prefer

Cream sauce optional

mix

Take the melted peanut butter and slowly whisk in the milk. It will solidify to an extent, but it being melted will help with the first few stirs.


vanilla

Add the vanilla, stir.


sesame

Add the brown sugar, cinnamon and sesame. Stir.


egg

Add the eggs, stir until combined. Let the stale bread soak in the mixture on each side for a couple minutes.

Fry them with a knob of butter or with a tablespoon of oil. Cook a couple minutes on each side, or until they turn golden brown.

*Hint

If for some reason the heat is initially too high and the sides cook too fast while the middle of the bread remains raw, fear not! Continue to cook until each side is golden brown and if they are still a little too soft in the middle, pop them in the microwave for about 15-20 seconds. This can also be done in the oven at 350 ˚F. This will in a way sear the bread for the coloration you want, but then let the bread finish off in less drastic heat.


cook

Finally take your jam and melt it in the microwave- do this in 20 second intervals while stirring. You should achieve a nice liquid. The above uses my dad’s homemade black grape jelly.

I thought that it could use a bit more liquid on top, so I added a last minute (optional) cream sauce made up of a tablespoon of marscapone, an Italian cream cheese, and enough milk to thin it out to the consistency of pudding.

Let me know how your French toast goes! I hope you like the combination of sweet and salty I’ve created.